Links
(DOS edition)


The famous REBEL chess engine since day one is developed under DOS (the best development environment for chess programmers) and also runs flawlessly under the Chesspartner Interface and the full Rebel XP release is expected soon, click here for a screenshot.
The DOS version of Rebel XP is already finished and is offered for free to long time customers. Rebel XP (the DOS edition) runs under its well-known DOS interface directly launched from your Windows desktop and is compatible with Windows 95/98/2000/ME.
Rebel is one of the strongest and most complete chess programs in the world and absolute champion providing the maximum information on your screen, the visualization of the internal thinking process of the chess engine (Rebel's brain), more below.
Rebel is famous for its playing strength and is feared among the world top chess players, Rebel for example never lost a serious match against the top chess players of the world. Rebel until now played 4 chess matches against Super GM Arthur Yusupov (1997), Super GM Vishy Anand (1998), GM John van der Wiel (2001) and recently against top player Loek van Wely (2002) and only Super GM Loek van Wely was able to hold Rebel on a 2-2 score, Rebel won the other 3 matches. No other chess program in the world has achieved that result!
What's new?
the chess engine
- The chess engine has gained +33 elo above its precursor Rebel Century 4 which is considered as a great improvement when you realize Rebel Century 4 was already rated above 2700 because of its performance against Super GM Loek van Wely. Therefore Rebel XP is estimated to play in the area of 2730-2750 elo being a Super GM itself.
- The +33 elo improvement in more detail, the search has been greatly improved, the new Rebel runs 35% faster than its precursor Rebel Century 4, king safety has been improved further, new chess knowledge has been added, especially on the concept of strong squares, better passed pawn handling. All in all the new Rebel plays the game of chess better then ever.
What's new?
the interface

- Further visualization of the internal thinking process of the chess engine (Rebel's brain), a new default screen layout, various new information windows with lots of new information.
- Added is a small analysis board that will allow you to scroll through the mainline during (or after) the thinking process using the 3 browser buttons (back, home, forward).
The "move-button" has another function, it will launch a rotating information system with 10 different windows of informations, a few examples:
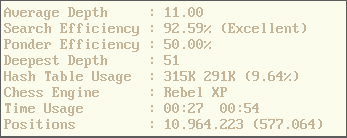
- Average depth : Rebel will maintain the average depth as long as the program is active.
- Search efficiency : Measuring Rebel's search algorithm, in general 90% and up is good, below 90% is not so good.
- Ponder efficiency : Measuring Rebel's permanent brain guessing the move of the opponent, in general 50% is just great, 60% and up is regarded as very good.
- Hash Table Usage : Column one, transpositions found for white in (K)ilobytes, Column 2 is for black, the third column is the percentage of the hash table that is filled.
- Time Usage : Rebel's estimated thinking time, the first column is the minimum time, the second column is the expected time when Rebel will move, very handy!
- Positions : Column one, total positions searched so far, Column 2, the average number of positions searched per second also known as NPS (nodes per second).
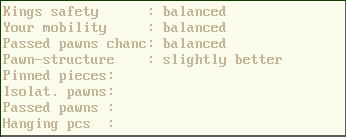
- The second window shows you all kind of interesting observations (and judgements) of the current position on the playing board.
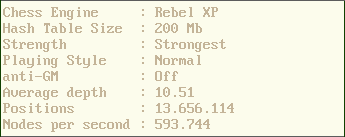
- The 3th window shows you the most important engine settings you have set as an easy-reference.
- The 4th window shows you the "game header" as it is saved in the database. Also very handy since you can see the main variation of a previous played game or position for comparison purposes.
 The 5th window example (remember there are 10!) shows you the complete main variation well formated and very
convenient in combination with the new small anaysis board to scroll the main-line of Rebel's thinking process.
The 5th window example (remember there are 10!) shows you the complete main variation well formated and very
convenient in combination with the new small anaysis board to scroll the main-line of Rebel's thinking process.
Secondly the window shows you the "Historic Search Statistic" (HSS). The HSS (for each depth) shows you how many positions Rebel has searched since you have installed the program, it also measures the percentage of how many times Rebel has changed its mind (move!) on a given depth. Also big score changes (+/- 0.50) are measured. Although it is quite a technical story the HSS will show you a so-called diminishing return the deeper Rebel is thinking.
 Also new, when Rebel is thinking it will display all the legal moves in the "consult window", the move currently
under investigation is marked. When Rebel has finished thinking it will display the usual information from the
loaded EOC or CAT database.
Also new, when Rebel is thinking it will display all the legal moves in the "consult window", the move currently
under investigation is marked. When Rebel has finished thinking it will display the usual information from the
loaded EOC or CAT database.
HINTS
- When you want back the original Rebel Century 4 screen layout click on the [2] button. Clicking on the [1] button will restore the Rebel XP layout. Button [3] will move you to the Rebel 10 layout.
- When you find the screen too busy for your eyes (too much information) decrease the INFO level to Usual or Extended via OPTIONS -> INFO -> USUAL.
- Is Rebel too strong for you? Rebel offers you various easy settings that will lower the playing strength, to name a few:
- Options -> Load Personality -> Novice Player : Rebel will play very weak (elo 1200-1500).
- Options -> Load Personality -> Average Club Player : Rebel will play about 1800 elo.
- Options -> Playing Strength -> Club Player : This is a very special option of Rebel, just like the average club player Rebel so now and then will make a serious mistake. On average Rebel will play on about 1800 elo.
- Extra -> Define Personality : this is the best possibility to lower Rebel's playing strength to your own level of play by lowering the item Strength of Play. For example using a value of 10 Rebel will adopt its strength as if it is playing on an old 80286, a value of 1 will result Rebel to behave playing on an old IBM 4.77 Mhz system from the 80's, the first Personal Computer.
PLAYING STRENGTH IMPROVEMENTS
some samples

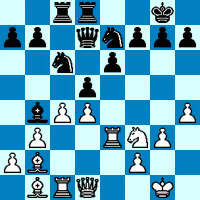
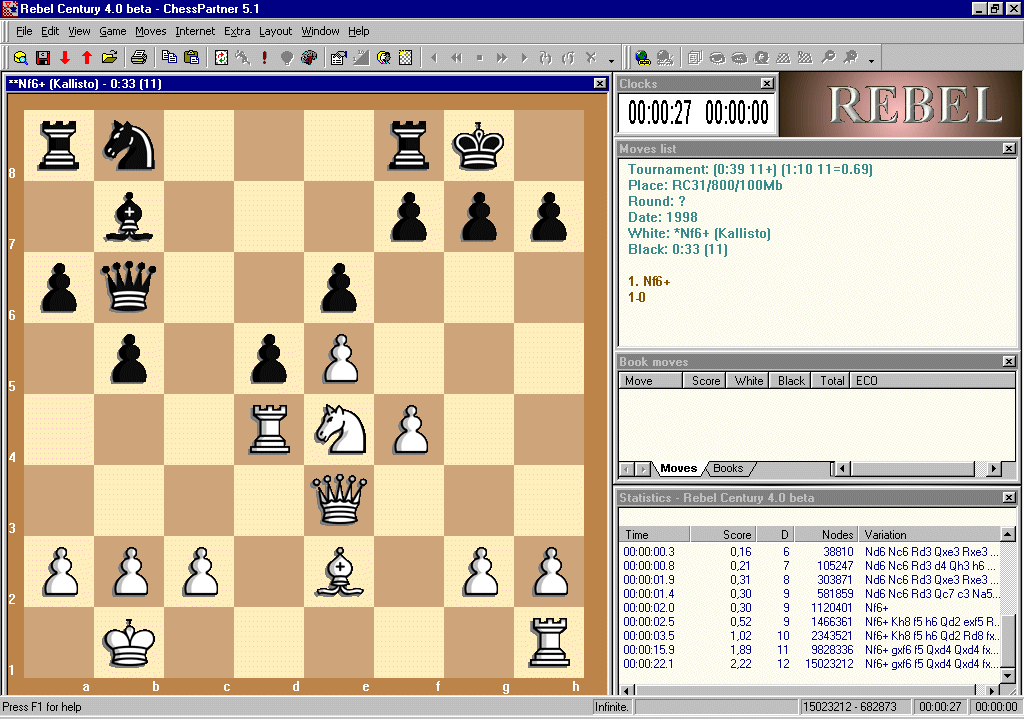
Diagram 1
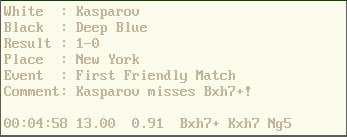
Key-move 1.Bxh7+!
Rebel Century 4 9:56
Rebel XP 1:46
Reference: Kasparov - Deep Blue, New York 1996, First
friendly match.
Comment : Kasparov was afraid to play 1.Bxh7+! and
played 1.a3 but won anyway.
Reason : Improved king safety chess knowledge.
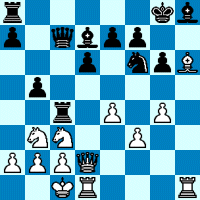
Diagram 2

Key-move 1.Bf8!!


Rebel Century 4   2:36

Rebel XP          0:32


Reference: Source unkown.


Comment  : After 1..Rxf8 black is helpless against

           2.Rxh8+! Kxh8 3.Qh6+ Kg8 4.Rh1


Reason   : Improved tactical search.
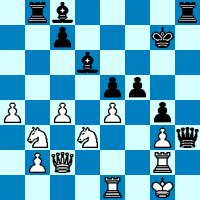
Diagram 3

Key-move 1..Rxb3!


Rebel Century 4   1:45

Rebel XP          0:22


Reference: Computer Chess Club


Comment  : Clearing a defender piece, the white king is now

           completely helpless against the black pieces.


Reason   : Improved king safety chess knowledge.
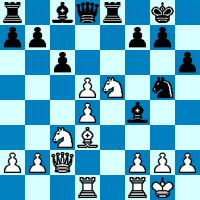
Diagram 4

Key-move 1..Rxe5!


Rebel Century 4   0:39

Rebel XP          0:05


Reference: ECM 98 test suite


Comment  : A king attack coming out of nothing.

           1..Rxe5 2.dxe5 Nf3+ 3.Kh1 Qh4 4.h3 Bxh3

           and so on.


Reason   : Better estimation to launch a king attack.
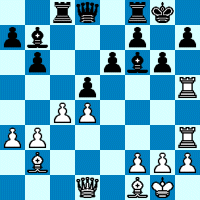
Diagram 5

Key-move 1..dxc4!


Rebel Century 4   1..gxh5? after 10:00

Rebel XP          1..dxc4! after 0:37


Reference: Keres - Smyslov


Comment  : Avoid the losing 1..gxh5?


Reason   : Better estimation how to defend itself

           against a king attack.
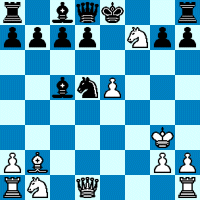
Diagram 6

Key-move 1..0-0!!


Rebel Century 4   2:36

Rebel XP          0:22


Reference: BS2830 test suite


Comment  : The mate net closes around the white king.


Reason   : Faster tactical search due to new search

           techniques.
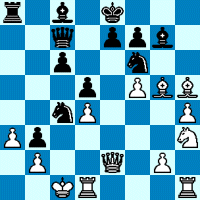
Diagram 7

Key-move 1..Rxa3!


Rebel Century 4   5:37

Rebel XP          0:19


Reference: Computer Chess Club


Comment  : Tempting are 1..Nxh5 or 1..Bxf5 however the

           bomb on a3 is much more effective.


Reason   : Better understanding king attack sacrifices and

           faster search.
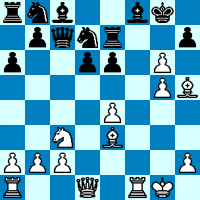
Diagram 8

Key-move 1.Nd5!!


Rebel Century 4   6:31

Rebel XP          2:26


Reference: Judith Polgar in action!


Comment  : A nice way to involve the white queen into

           the king attack, 1.Nd5! exd5 2.Qxd5+ and so on.


Reason   : Better understanding king attack sacrifices.

Diagram 9

Key-move 1.Ba3!!


Rebel Century 4   3:32

Rebel XP          1:24


Reference: Botvinnik immortal combination.


Comment  : 1.Ba3! Qxa3 2.Nh5+! and the black king is

           caught into a mate net.


Reason   : Faster Search. Botvinnik's moves is found on

           the same depth, but a lot faster...!
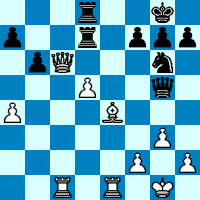
Diagram 10

Key-move 1.Bxg6!


Rebel Century 4   Bg2? after 10:00

Rebel XP          Bxg6! after 1 second


Reference: Alekhine's move.


Comment  : A fine positional move, since 1..Qxg6 and 1..hxg6 are

           answered with 2.Qxd7!! black is forced to capture the

           bishop with 1..fxg6 which causes a major weakening of

           the black king.

Reason   : Much better understanding of king safety.
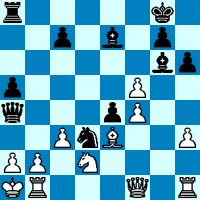
Diagram 11

Key-move 1..Nb4!


Rebel Century 4   2:13

Rebel XP          0:19


Reference: Source Unknown.


Comment  : Because of the Nc2 mate threat white is forced to

           take the kningt. Then after 1..axb4 the pressure

           on the white is simly to high to survive.

Reason   : Improved search and better understanding of the

           king attack.
Last but not least
- We kept the best news for the last, if you are the proud owner of one of the 3 below mentioned products then you are offered this brand-new version for free, that means rush to the subscription area and download this super chess program to your hard disk.
- This super download is available for those who have purchased:
- Rebel 11.0
- Rebel Century 4.0
- Gandalf 5.0
- After installation, the first time you start the program, you will be prompted to insert the original cdrom of either Rebel 11.0, Rebel Century 4.0 or Gandalf 5.0 to activate Rebel XP otherwise the program will not work.
- Not subscribed yet, or lost your subscription? Subscribe now...